WordPress is one of the most popular content management systems (CMS) in use today. It’s user-friendly, customizable, and it’s easy to add new users to your website. In this guide, we’ll show you how to add a new user to your WordPress website in just a few simple steps.
Step 1: Log Into Your WordPress Dashboard
To add a new user to your website, you’ll first need to log in to the WordPress dashboard using your administrator account.
Step 2: Navigate to the “Users” Section
Once you’re logged in, you’ll see a menu on the left side of the screen. Hover over the “Users” option and click on “Add New.” This will take you to the Add New User screen.
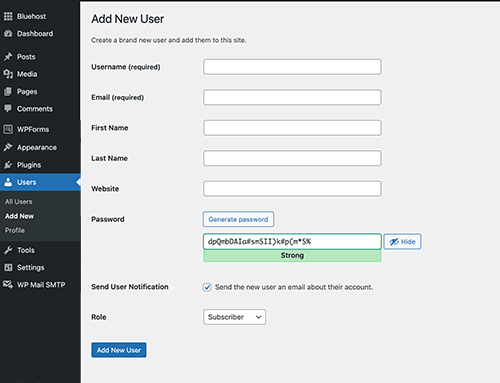
Step 3: Fill Out The User’s Information
On the Add New User screen, you’ll need to fill out the user’s information, including their username, email address, and password. Make sure the email address is accurate, as the user will receive an email with their login credentials.
Step 4: Select The User’s Role
From the “Role” dropdown menu, select the user’s role. This determines the level of access the user will have on your website. There are several roles to choose from,
• Administrator: Administrators have full access to all features and settings on the website, including the ability to add and manage users, install themes and plugins, and access the website’s code. If you are using our SEO services, this is the level of access we will need to conduct our work.
• Editor: Editors can create, edit, and publish posts, manage categories and tags, and moderate comments. They can also manage other users’ posts, but they cannot access the website’s settings or install themes and plugins.
• Author: Authors can create, edit, and publish their own posts, but they cannot manage other users’ posts or access the website’s settings.
• Contributor: Contributors can create and edit their own posts, but they cannot publish them. Posts must be submitted for review and approval by an administrator or editor before they can be published.
• Subscriber: Subscribers can read and comment on posts, but they cannot create or edit content.
• Super Admin This role is only applicable for the multisite WordPress set up where one can manage the entire network of sites from one central dashboard.
Please note that depending on the version of WordPress you are using and the plugins you have installed, you may have additional user roles available. Also, some plugins may also provide custom roles with specific capabilities.
Step 5: Add the new user
Once you’ve filled out all of the user’s information, click on the “Add New User” button to create the new user account. The new user will receive an email with their login credentials and a link to log in.
Step 6: Verify the new user details
To verify the new user details are correct, visit the Users section in the dashboard and verify the new user is present in the list.
Step 7: Assign specific access rights
To assign specific access rights to the user, visit the User section, select the user, click on “Edit” and then go to the “Permissions” tab.
—
In conclusion, adding new users to your WordPress website is easy. With just a few simple steps, you can give new users access to your website and assign them the appropriate level of access. This can be useful if you have multiple authors or contributors on your website.
Please note that these steps may vary slightly depending on the version of WordPress you are using.